Showing posts with label Python. Show all posts

Thursday, March 19, 2015

LunchBox - New Rationalization Nodes and Panel Improvements

"Planarize Points" node will project a collection of points to a common plane.
A new release of LunchBox for Dynamo has been posted to the package manager.

In this release, I made modifications to the paneling nodes so they can better support a range of Dynamo lists and nested lists (no easy task with Python nodes in Dynamo!)  I have also included a few basic "Rationalization" nodes that let you create collections of planar points and rationalize splines into arc segments.

LunchBox is featured heavily in CASE's Dynamo training curriculum.  We are running workshops during the month of April, so be sure to sign up if you are interested!

Using curve parameters to describe co-tangent arcs.
Rationalized spline curves using co-tangent arc segments
Here I am using "planarize points" to define projected flat panels

Friday, January 2, 2015

Parametric Forms for Dynamo with LunchBox


I have had a long standing fondness for parametric forms and surfaces that I thought it was about time I re-introduced some of them into the LunchBox package for Dynamo.  The Grasshopper plug-in already had many of them implemented so it was a matter of migrating some of the code to the Python nodes.  Dynamo is a bit touchy with self-intersecting surfaces and there is currently no way to establish "preset" parameter inputs for a node.  With that in mind, I have also included a few sample definitions in the latest package so you can check out some of the parameters.

Have fun.... oh and Happy New Year!

Sunday, May 25, 2014

LunchBox for Dynamo: Bring your BIM into your Algorithm


Memorial Day weekend is upon us here in the US.  If you have some free time this holiday weekend, be sure to check out the latest version LunchBox now available through the Dynamo Package Manager

The LunchBox package contains 30 new nodes to aid in your Revit workflow.  The nodes are completely free with the Python script source fully accessible.

The most notable recent additions are "Element Collector" nodes which allow you to reference different element types (families, rooms, curtain wall, etc.) into Dynamo.  This workflow makes it easy to reference key element geometry and mine your Revit model for information.


The Structural Framing collector allows you to reference existing Revit structural elements into Dynamo.
LunchBox for Dynamo currently features 27 nodes... and growing.

Saturday, January 19, 2013

Blender Python: The Supershape Rises

Rounding out a trilogy of Supershape posts over the years, I have created an implementation for Blender Python.  This script defines the 3D Supershape using mesh vertices and faces.  The script also contains useful methods for calling the Blender subdivision modifier and removing duplicate vertices from the mesh.  The images below are rendered using the Cycles engine.


Sunday, January 13, 2013

Blender Python Notebook!

Blender 3D has become one of my latest computational hobbies...

Not only does this open source modeler have an extensive set of mesh modeling tools and rendering capabilities, it also features an extensive Python API.  Following the format of my RevitPythonShell resource, I have created a new Notebook for capturing some cool Blender Python techniques....

As of this post, there are tips and code snippets related to.
  • Environment and Set-up
  • Defining a Mesh
  • Applying a Modifier
  • Creating a Mathematical Mesh
  • Creating a Randomized Mesh
Check back often for more!


Tuesday, November 20, 2012

Autodesk University 2012, See you next week!

Next week is the Autodesk University 2012 convention in Las Vegas, NV.  CASE will be out in force, so be sure to track us down.  Topics of conversation can and should include design technology, computation, Battlestar Galactica, Game of Thrones....  oh yeah... and figuring out how we can do business with you!

Track CASE down at the convention... or by checking out the #casetweetup event

ALSO...If you haven't already, be sure to sign up for the class...

Coding Autodesk Vasari: Scripting for Conceptual Design 

I am teaming with Matt Jezyk and Zach Kron for this session on Wednesday morning 8:00AM-9:30AM (man, that's early)

We'll be showing off all sorts of computational goodies in our hands-on lab...


Wednesday, August 15, 2012

ACADIA Workshop: Python Scripting for Revit and Vasari


This October, I will be instructing an ACADIA workshop:  Python Scripting for Revit and Vasari.  The workshop will cover the basics of using Python with an emphasis on the Conceptual Modeling capabilities of Revit and Vasari.  We will also investigate opportunities for extracting information from models and enabling workflows with other data sources.

Be sure to sign up at the ACADIA website and check out the other workshop offerings along with the conference info!


Wednesday, July 18, 2012

Now on YouTube! Vasari Talk 13: Scripting with Python

For those that missed my Vasari Talk about scripting with Python, you can now view the video on YouTube!

PART 1


PART 2

PART 3

Friday, May 4, 2012

Revit API: Mesh Reconstruction

Here are a couple of images showing a reconstructed mesh in Vasari that was originally created with Grasshopper and Kangaroo.  The mesh is made of quads and was rebuilt with adaptive components using the API


Saturday, April 28, 2012

Revit API: Divided Surfaces and Excel Interop

A few more sections of the Revit API have been published.
  • Creating Divided Surface:  Explains how to create a Divided Surface using the API and access the tiling patterns available.
  • Reading and Writing Excel:  Explains how to access an Excel spreadsheet to read and write values.
...to learn more visit my Revit API Notebook....

Additionally, Lilli Smith recently posted on an interesting example on Buildz for using RevitPythonShell to generate program blocks.  The approach is built on top of my Revit API notebook examples related to adjusting family instance parameters and accessing external text files.

On my end, here is some eye candy to show what I have been up to lately.  I am creating a strange 'catenary' surface with Kangaroo and Grasshopper.  I am then feeding the information into an Excel spreadsheet and reconstructing the shape using Adaptive Components via RevitPythonShell.  Note how I am also able to adjust the radius parameter of the pipe members within Revit to reflect the 'force' diagram created in Kangaroo.


Saturday, April 21, 2012

Revit API: Adaptive Components

Below are some tests for automating the creation of Revit's Adaptive Components using the API and Python.  

The placement of the Adaptive Components is driven from a Klein surface and quad grid created in Grasshopper using my LunchBox plug-in.  This workflow allows the user to create and manipulate a lightweight model in the Grasshopper environment and then automate the creation  of the design within the Revit/Vasari environment using native parametric elements.

For information on placing Adaptive Components with the API and Python....


Sunday, April 1, 2012

Revit API: Objects, Parameters, and Parametrics

I have made a few more additions to my Revit API Notebook...
  • Object Oriented Programming:  The section shows how to define classes within an IronPython script for improved workflow.
  • Reading and Writing External Files:  Shows a few helpful techniques for reading and writing external text files.
  • Parametric Forms:  Demonstrates a technique for creating cool, parametric forms and surfaces.


Saturday, March 24, 2012

Revit API Notebook: Randomization Examples

Tired of making the 'same old' formula-driven shapes?  Why not sprinkle a dash of randomization into your BIM casserole.

This RevitPythonShell section looks at using .NET's Random class as a means of creating irregular geometry and adjusting family parameters.  The examples intentionally use modified code from previous basic examples so you can track the logic.


Tuesday, March 20, 2012

My Revit API Notebook!


This wiki page is my personal (re: public) diary for exploring the Revit API. This page is as much a resource for me as I hope it will be for others.

 Developing custom tools for Revit using the API can be a complicated endeavor. The program is quite complex and the development process is not nearly as straightforward as developing tools for more 'free geometry' modelers such as Rhino. Please see Jeremy Tammik's article titled BIM versus Free Geometry and Product Training for a more detailed explanation of the 'barriers to entry' in Revit API development.

This notebook attempts to remedy a few 'resource deficiencies' in learning and applying the Revit API in a design workflow…
  •  Design-Related Techniques: Most API examples I have found on the web are related to model management. For designers interested in computation and automation, finding good design-related examples can be a frustrating experience. The examples here show how the Revit API can be used as a design tool specifically within family creation environments such as the conceptual mass. 
  • Vasari Implementation: Vasari is essentially a stripped down version of Revit with additional conceptual design and analysis capabilities (and it's free!). Vasari also features a version of the Revit API. The examples here will focus on Varsari's capabilities but most will be applicable in the full versions of Revit. 
  • RevitPythonShell-Based Examples: Not many examples exist for using the RevitPythonShell Add-In. The tool provides many iterative scripting capabilities similar to those found in other popular modeling tools such as Rhino. This makes the Revit API much more accessible to designers and those in need of some quick automation!
My hope is that this will save designers time in being productive with the Revit API and perhaps contribute to the creation of a more serious 'scripting culture' around Revit and BIM tools in general….

Current examples include basic geometry creation techniques and family parameter manipuation.  I will progressively post more interesting examples in the coming weeks and months. Keep checking back!!!

This is still work in progress and I am learning new things every day. I am positive a few of you could teach me a thing or two… If you have any comments or suggestions please let me know! nmiller.arch@gmail.com 

Enjoy!

-Nathan Miller


Thursday, July 21, 2011

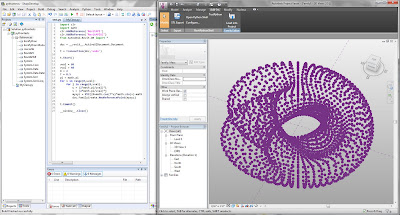
The Supershape Returns... with Vasari and IronPython


So to continue the theme, I thought I would take a crack at creating a script for generating 3D Supershapes using strictly IronPython and the RevitPythonShell.

The script creates reference points based on mathematical formula and draws section curves in one direction. I then used the loft form method to connect adjacent curve together and describe the surface. I should note that lofting the sections together for a continuously smooth look fails under just about every scenario... I hope more options are available in the future.

Speed wise... well... it sure takes its sweet time to generate the geometry. Other scripting environments are lightning fast when dealing with similar levels of complexity. In the future, I hope the Revit/Vasari team can streamline the form creation process and provide more creation methods...

Tuesday, July 19, 2011

Installing IronPython with Vasari


Zach Kron from Buildz recently posted an very cool example of using IronPython with Revit/Vasari. This is made possible using RevitPythonShell by Daren Thomas. This got me excited to kill two bird's with one stone 1. See what Vasari is all about and 2. start digging into Python.

I had to go through a number of blog posts to get all the pieces to work together (most only told part of the story). The fact that Vasari tries to keep everything under the hood a secret does not help matters.

So to ensure you do not exhaust as much time getting it to work as I did... I present...

The 12 Step Program to get Vasari to work with IronPython

First why would you WANT to do this? Unless you are going through the VSTA in Revit ( this is not available in Vasari), you have to use Visual Studio to compile a plug-in and load it as an Add-In. This can be a cumbersome experience if you want a more fluid scripted workflow where you can test code on the fly.

Enter
RevitPythonShell. This plug-in gives Revit/Vasari the capability to execute IronPython scripts with full access to the Revit API. Once it is up and running, you are able to quickly test different code from either the command console or a script editor of your choice.

The steps below are more specific for Vasari. For those unfamiliar, Vasari is a standalone package of some of Revit's more conceptual modeling and analysis features. The application is a free download.

Instructions:

Note: Currently, RevitPythonShell works with Revit 2011 and Vasari 1.1. RevitPythonShell is not yet compatible with Revit 2012 or Vasari 2.0.

1. Download Autodesk Vasari 1.1
2. Download and install Python 2.5
3. Download and install RevitPythonShell (includes IronPython 2.0 DLLs)
4. Launch the Vasari.exe file for the first time.
5. After Vasari has launched... close Vasari.
Note: Vasari comes as a standalone exe file but it does create a few folders on your computer which you will need in order to get it to work with RevitPythonShell.

6. Navigate to the following directory (Windows 7): C:\Users\*yournamehere*\AppData\Roaming\Autodesk\Vasari\Addins\TP1.1
Note: This directory is where you can place custom Add-ins. Revit 2011 add-ins that take advantage of the conceptual massing environment can be also be used with Vasari. (More info can be found at TheBuildingCoder)

7. Download this revitpythonshell.addin file and place it in the TP1.1 directory.
Note: This is an XML file I made which contains a path to the RevitPythonShell.dll directory. You may need to open the file to verify the path to the assembly file is correct.

8. Launch Vasari 1.1
9. Exit the current massing editor ('Cancel Mass' in the ribbon)
10. Click on the 'Add-Ins' menu tab. Viola! If you did everything correctly, you should have a RevitPythonShell menu category with "Open Python Shell" and "Configure..." buttons available.
11. Click "Configure Commands". Check that a Search Path is included for C:\Python25\Lib (this is necessary to make use of the AutoComplete feature and to make use of other standard libraries)
12. Download an IronPython IDE (like SharpDevelop) to write scripts. You can load them using "Configure..." through the Vasari Add-In tab.

If this post needs any corrections or clarifications, please let me know!