Zach Kron from Buildz
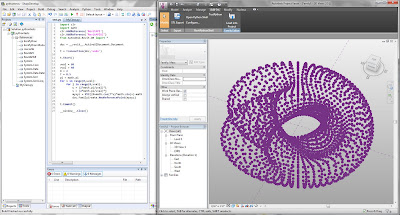
recently posted an very cool example of using IronPython with Revit/Vasari. This is made possible using
RevitPythonShell by Daren Thomas. This got me excited to kill two bird's with one stone 1. See what Vasari is all about and 2. start digging into Python.
I had to go through a number of blog posts to get all the pieces to work together (most only told part of the story). The fact that Vasari tries to keep everything under the hood a secret does not help matters.
So to ensure you do not exhaust as much time getting it to work as I did... I present...
The 12 Step Program to get Vasari to work with IronPython
First why would you WANT to do this? Unless you are going through the VSTA in Revit ( this is not available in Vasari), you have to use Visual Studio to compile a plug-in and load it as an Add-In. This can be a cumbersome experience if you want a more fluid scripted workflow where you can test code on the fly.
Enter RevitPythonShell. This plug-in gives Revit/Vasari the capability to execute IronPython scripts with full access to the Revit API. Once it is up and running, you are able to quickly test different code from either the command console or a script editor of your choice.
The steps below are more specific for Vasari. For those unfamiliar, Vasari is a standalone package of some of Revit's more conceptual modeling and analysis features. The application is a free download.
Instructions:
Note: Currently, RevitPythonShell works with Revit 2011 and Vasari 1.1. RevitPythonShell is not yet compatible with Revit 2012 or Vasari 2.0.
4. Launch the Vasari.exe file for the first time.
5. After Vasari has launched... close Vasari.
Note: Vasari comes as a standalone exe file but it does create a few folders on your computer which you will need in order to get it to work with RevitPythonShell.
6. Navigate to the following directory (Windows 7): C:\Users\*yournamehere*\AppData\Roaming\Autodesk\Vasari\Addins\TP1.1
Note: This is an XML file I made which contains a path to the RevitPythonShell.dll directory. You may need to open the file to verify the path to the assembly file is correct.
8. Launch Vasari 1.1
9. Exit the current massing editor ('Cancel Mass' in the ribbon)
10. Click on the 'Add-Ins' menu tab. Viola! If you did everything correctly, you should have a RevitPythonShell menu category with "Open Python Shell" and "Configure..." buttons available.
11. Click "Configure Commands". Check that a Search Path is included for C:\Python25\Lib (this is necessary to make use of the AutoComplete feature and to make use of other standard libraries)
12. Download an IronPython IDE (like
SharpDevelop) to write scripts. You can load them using "Configure..." through the Vasari Add-In tab.
If this post needs any corrections or clarifications, please let me know!


